If a customer wants to prepay an existing order or invoice with a credit card, Impress has the ability to have multiple credit card prepayments entered and pre-authorized in Sales Order Entry and Invoice Entry. Authorized users can pre-authorize the credit cards in Sales Order Entry, Invoice Entry, and capture the cards in Deposit Entry. Users are not able to enter and authorize credit card payments in Deposit Entry.
If you are using an Impress Version prior to Impress 5.5, please view article #50016 for information on the features and settings.
Impress is configured to integrate with some Merchant Service Gateways and are available today at no extra charge. There are other available Merchant Service Gateways available, but they require additional work to implement with a one-time charge to set up the gateway. To see which Merchant Service Gateways can be integrated with Impress, go to http://www.impresserp.com/gateways.htm.
Configuring Impress
- Go to AR > Setup.
- Click on the Credit Cards tab.
- Populate the required fields for your Merchant Service Provider. Only the fields that are required by the Merchant Service Provider will be displayed in the tab.
- Select whether users should be able to pre-authorize or reverse the credit card prepayments in Sales Order Entry and Invoice Entry, check the Process Credit Card Authorization In Order/Invoice Entry box. Checking this option will allow the Pre-Authorize and Reverse buttons to appear in the Customer Payment window.
- Configure the Maximum Days to Keep Credit Card On File with a reasonable amount of days. In order to be PCI complaint, credit cards should be kept on file for a "reasonable" amount of time. Impress meets PCI compliance utilizing encryption and masking information where appropriate. Users can adjust the number of days that they would like to retain historical information to be what you deem as "reasonable". PCI compliance regulations does not give a set amount of days.
- Click on F10 - Save.

Entering Prepayments in Sale Order/Invoice Entry
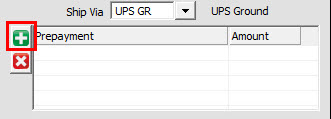
- In Sales Order Entry, click on the Order Lines tab or in Invoice Entry, click on the Invoice Lines tab.
- In the Sub-Total section, click on the Add a new payment button to open the Customer Payment window.
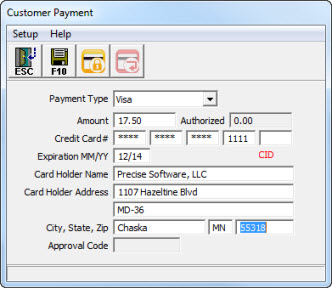
- In the Customer Payment window, select the credit card Payment Type from the drop-down.
- Enter in the: Amount, Credit Card# with CID (if required), Expiration Date, Card Holder Name and Address.
- If you want to save the prepayment, but not pre-authorize the credit card, click on F10 - Save. If the user is not authorized to process a credit card, they will only have the option to Save.
- If you want to pre-authorize the credit card, click on the Pre-Approve Transaction button.
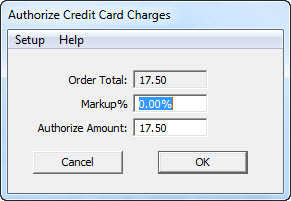
- This will open the Authorize Credit Card Charges window. This window will allow you to pre-authorize an amount above the Order Total by either a Markup% or a dollar amount (by entering in a manual Authorize Amount). The markup might be needed to allow for the actual shipping charges in Invoice Entry.
- Click on OK.
- In the Customer Payment window, click on ESC to go back to the order/invoice.
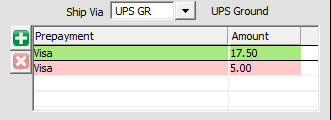
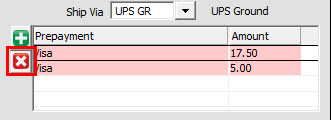
- If you Pre-Authorized the credit card, the card will appear with a green background; if you did not Pre-Authorize the credit card, the card will appear with a red background.

Reversing a Pre-Authorization
- In Sales Order Entry, click on the Order Lines tab; in Invoice Entry, click on the Invoice Lines tab.
- In the Sub-Total section, double-click on the prepayment, that needs to have the pre-authorization reversed, to open the Customer Payment window.
- In the Customer Payment window, click on the Reverse Transaction button.
- This will remove the pre-authorization from the credit card and allow you to either make changes to the prepayment or delete the prepayment.

Deleting a Prepayment
- In Sales Order Entry, click on the Order Lines tab; in Invoice Entry, click on the Invoice Lines tab.
- In the Sub-Total section, click on the prepayment you want to delete.
- Click on the Remove the payment button.
- Confirm the removal of the prepayment, click Yes to delete the prepayment, click No to keep the prepayment.
Manually Pre-Authorizing or Capturing Credit Cards
If you need to manually enter the pre-authorization or capture Approval Code, follow these steps:
- In the Customer Payment window, right-click in the Approval Code field and choose Enter Approval Code...
- In the Enter the approval code: field, enter the pre-authorization/capture approval code.
- Click on OK.
Manually Removing An Authorization or Capture Approval Code
If you need to manually remove the authorization or capture approval code, follow these steps:
- In the Customer Payment window, right-click in the Approval Code field and choose Clear Authorization...
- In the warning window, click on Yes to remove the authorization code, to the question: You should really try to Reverse an Authorization before trying to clear it. Some merchant services do not allow you to Reverse the Authorization though, leaving you no choice but to clear it. Are you sure you want to clear the Authorization?
Credit Cards in Deposit Entry
Impress Tip: Use Access to control which tabs are accessible to individual users.
Deposit Entry has several tabs for credit cards: Captured Credit Cards, Authorized Credit Cards, and Other Credit Cards.
Captured Credit Cards
The Capture Credit Cards tab will show all credit cards that have been captured (charged). Double click on the prepayment to add it to a deposit.

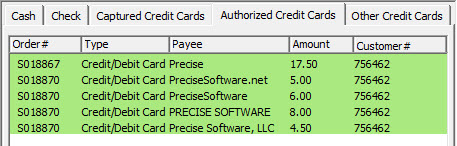
Authorized Credit Cards
The Authorized Credit Cards tab will show all credit cards that have been pre-authorized. Double click on the prepayment to capture the charge and add it to a deposit.
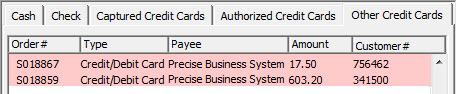
Other Credit Cards
The Other Credit Cards tab will show all credit cards that have not been pre-authorized or captured. Double click on the prepayment to capture the charge and add it to a deposit.
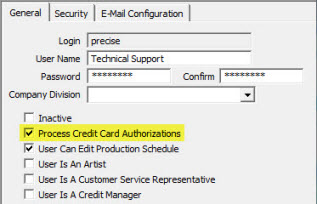
Giving Authorization/Capture Access to Impress Users
- Go to Utilities > Users.
- For each of the users who will process credit card payments, check the Process Credit Card Authorizations box. Only the users that have this option selected will have an active Authorize button in Sales Order Entry, Invoice Entry, and Deposit Entry.
Invoice Posting
If the credit card payment has not been captured when the invoice is posted, Impress will automatically capture the credit card before the invoice is posted. If Impress is unable to capture the credit card, the invoice will not be posted. Look at the Invoice Posting Report for details on why the credit card could not be captured. The Invoice Posting Report will print automatically when invoices are posted.
- Impress Versions 5.5 and higher
 Back to the top